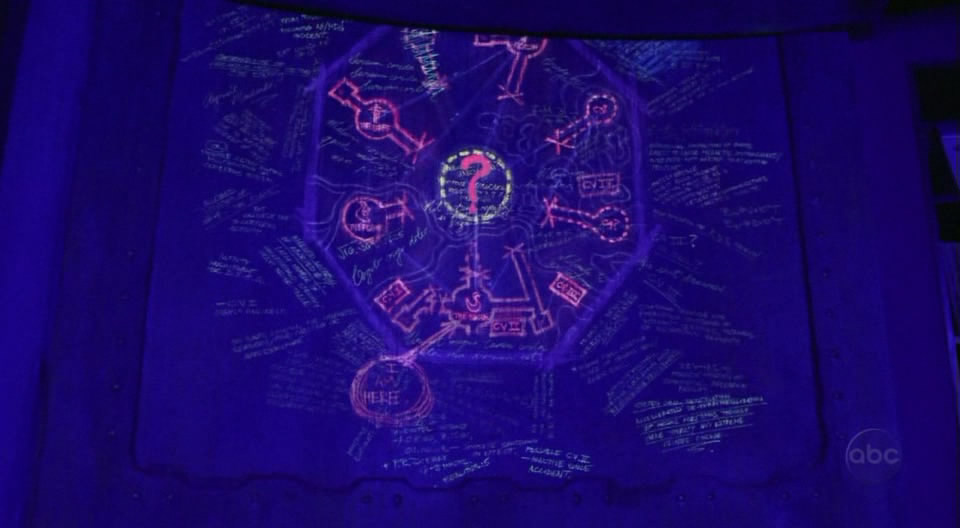
Locke looking at the hidden map with legs pressured below the Blast Doors
Inside the Swan are a series of blast doors which can seal parts of the bunker in a "lockdown" mode, the cause and purpose of which is currently unknown. During the lockdown, a series of black lights reveals a huge, hand-drawn map on the surface of one of the blast doors. Locke's Map is his attempt to remember what he saw during the brief period when the blast door map could be seen.
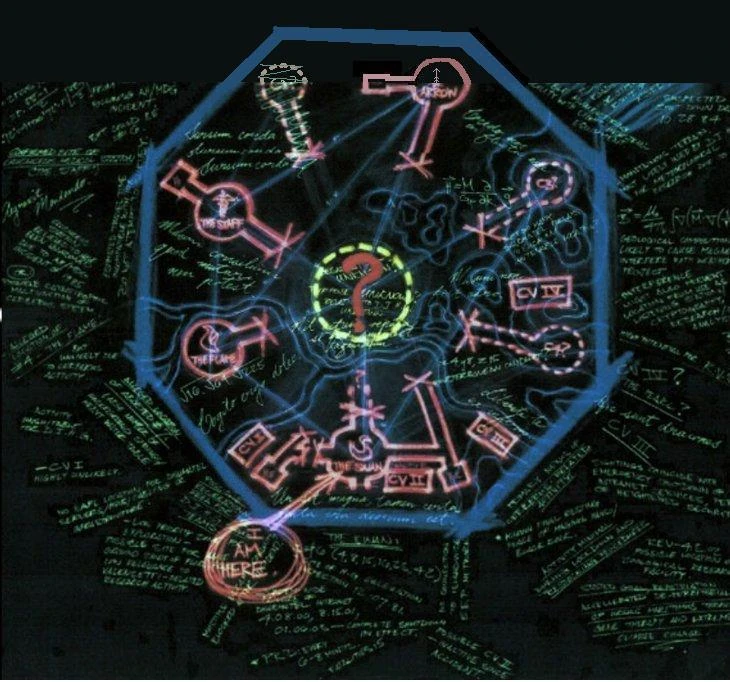
The hidden map on the blast door as seen in the episode Lockdown
- Seems to be a crude map of at least part of the Island. The perimeter is octagonal and reminiscent of the DHARMA Initiative's logo.
- Can only be viewed by black light. Written in unknown substance. Candidates include bleach, turmeric, blood, urine, quinine, laundry detergent, or a choice of many UV-fluorescing substances, including fluorescent highlighting markers.
- There are at least two types of notations on the map: Printed notes in English, which are very factual and seem informed; and Latin-language notes in a cursive hand, which are more observational and speculative—even philosophical.
- Beneath the writings and drawings is a topographical map of part of the island not visible in ultra violet.
- Apparently created by Radvinsky, and worked on by Kelvin using bleach and other chemicals as the ink.
- Radvinsky, Kelvin, and Desmond forced Lockdown Incidents to work on the map.
Locations and geography
Main article: Hidden Map Geography
The hidden map shows the location of six stations (with a seventh scratched out), all "pointing" to the center of the island, represented on the map by a large question mark (Could be the "The Pearl"). Four of the bunkers have both graphics and text identifiers, apparently their respective names and logos; the two remaining have no titles, and their icons are difficult to decipher.
Notations
Main article: Hidden Map Notations
There are numerous handwritten notations on the map. Some are written in Latin, while others are written in English. The notes are written in several scripts, suggesting multiple contributors.
The Latin phrases appear to be more of a running commentary than insightful notations about the map.
By contrast, the majority of the notations written in English address the various stations, a cryptic incident, possible shutdowns, a Cerberus system, a DharmaTel network, scientific equations, and zoological research.
Math, equations, science
Main article: Hidden Map Equations
There are several equations written as additional notations on the hidden map. Two of the equations appear to be engineering/physics equations related to magnetics. There is also third equation, a trigonometric problem, in the top left corner of the map.
Timeline
Main article: Hidden Map Timeline
There are several notations on the hidden map that appear to be dates. Some appear to indicate a "shutdown" occurred. What was shut down and why it was shutdown are unknown. These dates use a month/day/year format. There is another date reference to a zoological research facility and a reference to something called an AH/MDG incident of 1985.
Locke's Map
Main article: Locke's Map
In the episode S.O.S., Locke attempts to recall what he saw on the Blast Door Map. He appears to recall the station locations, the 'rivers' and the "?" in the middle the best.
Theories and commentary
Please note that each of the subarticles related to the map have a theory and commentary section dedicated to that subject. This area is intended to speak to general theories about the orgins or purpose of the map itself.
- The map refers to an AH/MDG Incident. The "AH" in AH/MDG Incident could stand for Alvar Hanso. The "DG" part of "MDG" could stand for DeGroot.
- MDG could refer to Maritime Dangerous Goods. An international spec on transporting dangerous goods by sea.
- On the map there are eight crosses. These crosses could mark the blocked passageways which lead to the ? in the center, and protect the outside from whatever is in there. We have already seen the concrete filled passage in the Swan.
- The map was apparently drawn by The Swan's previous inhabitants (like Desmond, Kelvin, and, judging from the mural, perhaps Thomas), raising the question: Were they able to lower the blast doors themselves, or did they create the map only during the automated lockdown mode?
- A strange thing however is, that the notes on the map sound more like planning notes (e.g. "not a suitable place for...not safe place for...") It may be that the map was not (or not entirely) made by previous inhabitants, or is partially derived from another map?
- The message preceding the lockdown is hard to understand due to static, with one part possibly saying "begin protocol" and ends with a countdown to zero. Perhaps it was being broadcast by a passing aerial vehicle (silent enough not to be heard by the beach residents) as it delivered the fresh supplies.
- Possible other theories on what is being said in the message: "Please proceed to terminal". When Locke is adjusting the speaker, there's a spike of feedback. Right after this there's what sounds to be something in German, starting with "Zeit" which translates to "time". Upon closer examination, however, it sounds more like "17 minutes to lockdown" which is consistent with the "20 minutes to lockdown" heard while Locke is on the bike.
- The blast door was not down all of the way since Locke's legs were caught underneath. There may be crucial information at the unseen top of the map.
- The Blast Doors may come down because Dharma sent new supplies to the island.
- At first sight it seems the air venting system is useless because one can bypass the blast doors easily. Fake Henry Gale used it to traverse the blast door between the living room and the dome. As one can see in Episode 9 of Season 2 "What Kate Did" in the scene where Locke frees Jin of his handcuffs Michael is standing in the other entrance examining the dome's second blast door he asks Locke about. So in a case of a lockdown the dome is completely sealed off the other areas but is still accessible through the air vents from the living room. This means that using the air venting system to traverse the blast door between the living room and the dome doesn't make it useless because you are still inside the sealed area.
- The shape of the map seems to echo the shape of the Buddhist Dharma wheel.
- Maybe the island is shaped like the Dharma logo.
- What is the purpose of drawing on the door in invisible inks/paints? Or on the door at all? Is this information being hidden from someone?
- Why would someone detail this information on the blast door where it would be useless except for every once in a (seemingly distant) while when the doors shut unless they had a way to manually lower the doors whenever they wanted? This would make more sense as it would allow total privacy whenever the information was in plain view. It would make sense for there to be a means of lowering the doors manually, probably from within the room which is locked down.
- There may be a way to access the doors when they're in their retracted positions, through the ceiling of the room, or on the level above the room. Assuming that the lockdown in the eponymous episode is of a representative duration and frequency, it may be more likely that the map was made during "non-lockdown" periods.
- The people who created the map knew about The Pearl's observation ability and put the map on the blast doors where it could not be observed.
- The extensive use of Latin in the blast door commentary may serve as further encryption for sensitive data. Since it is only viewable when the lights are off, someone who is not learned in Latin would have a difficult time translating in the dark. That would limit its intended audience to well educated scientists, doctors, linguists, etc.
- The Map could have been created by Kelvin and/or Desmond because they were aware of the existence of other stations.
- Perhaps Dharma Wanted them to find the ? aka The Pearl.
- Perhaps The Pearl is not the question mark in the middle of the map, but the hatch to the right of The Swan marked C4.